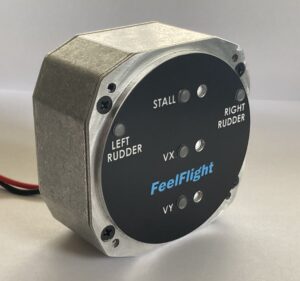
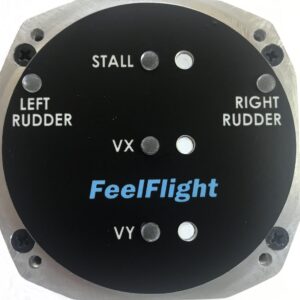
This is the front face of the control module. There are three LED lamps labeled Vy, Vx, and STALL. The flashing of these lamps is synchronized with the pulsing of the thrust pins in the haptic grip. There is an audible tone that beeps in synchronization with the Vx signal. As your angle of attack increases beyond Vx, this tone accelerates. When you get close to stall the tone beeps in sync with the pulsing red stall lamp and the index finger thrust pin. This is triple modality and is very powerful for successful sensory input of the pilot. There are also LED lamps for “left rudder” and “right rudder.” These pulse when you are in an uncoordinated turn. Again, this pulse is synchronized with the left or right grip thrust pins.” This feedback duplicates the typical “ball” gauge. The white buttons next to Vy, Vx and STALL are for calibration. A huge feature of FeelFlight is that it is the easiest AOA system to calibrate. This is particularly important for allowing the pilot to hold Vy and Vx to a high degree of accuracy. The AOA sensor is accurate to 1/20 of a degree and the sensitivity for Vy is programmed to +/- one half of a degree. This kind of discrete AOA accuracy can help save lives in an engine out situation.
The control module mounts into a standard 3 1/8″ instrument hole. It can also be mounted on the face of the panel and recessed as desired. It is only 2 inches deep.
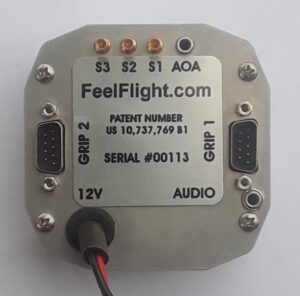
BACK PANEL INPUTS AND OUTPUTS
Starting with the top left is the AOA input. After the AOA sensor is mounted on the bottom of the wing, or on the side of fuselage on a glider, or in a wing inspection plate (included), you simply run the included cable down the inside of the wing and plug it into the back of the control module. The system allows you to run two FeelFlight grips. The output ports for the two grips are labeled GRIP #1 and GRIP #2. The next jack to the right is “AUDIO.” This allows the audio output to be sent to an intercom input or wired directly to the headphone jack.
The bottom left jack is your 12 volt input supply voltage. The cable and “in line” 3 amp fuse are included. You simply attach the 12V line to an underused circuit and attach the ground wire to ground. It is that easy!
SETTING ANGLE OF ATTACK
The FeelFlight system comes calibrated with Vy = 8 degrees, Vx = 13 degrees and imminent stall = 16 degrees. These numbers are accurate for many models of Cessna and many other airfoils. However, it is very easy to define the angle of attack for each thrust pin. The pilot picks a day that is close to standard temperature and pressure. With the airplane at gross weight, simply fly the airspeed that gives the best rate of climb. You then press the button that is labeled “best rate of climb.” The process is repeated for best angle of climb and imminent stall. From then on, the thrust pins will pulse to signal angle of attack for “best rate of climb,” “best angle of climb,” and “imminent stall,” regardless of aircraft weight, density altitude or speed. Note: the AOA assignment button switches are slightly recessed so that they are not inadvertently pressed. Also, the accelerometer sensor in the control module is calibrated at the factory and there is no need for the pilot to calibrate. However, the control module must be installed level with the wings for the “yaw” signal to be accurate.